Random Point Jitter

Random Point Jitter

Script for Adobe Illustrator

Functionality

Random Point Jitter is an Adobe Illustrator script that randomly shifts anchor points and/or Bezier handles of selected paths. This allows for controlled randomness in vector artwork, useful for adding organic imperfections, hand-drawn effects, or artistic distortions. Users can set horizontal and vertical displacement ranges, choose the jittering mode, and control how many points are affected.

Before / After


Installation

  • Place the script in your Illustrator Scripts folder:

    MacOS:
     /Applications/Adobe Illustrator <Version>/Presets/<Language>/Scripts
    Windows: C:\Program Files\Adobe\Adobe Illustrator <Version>\Presets\<Language>\Scripts

  • Restart Adobe Illustrator to load the script into the File > Scripts menu.

Using the Script

  • Select Objects
    Select one or more objects in your Adobe Illustrator document that you wish to adjust.

  • Run the Script
    Go to File > Scripts > Random Point Jitter to launch the script.

  • Adjust Jitter Settings
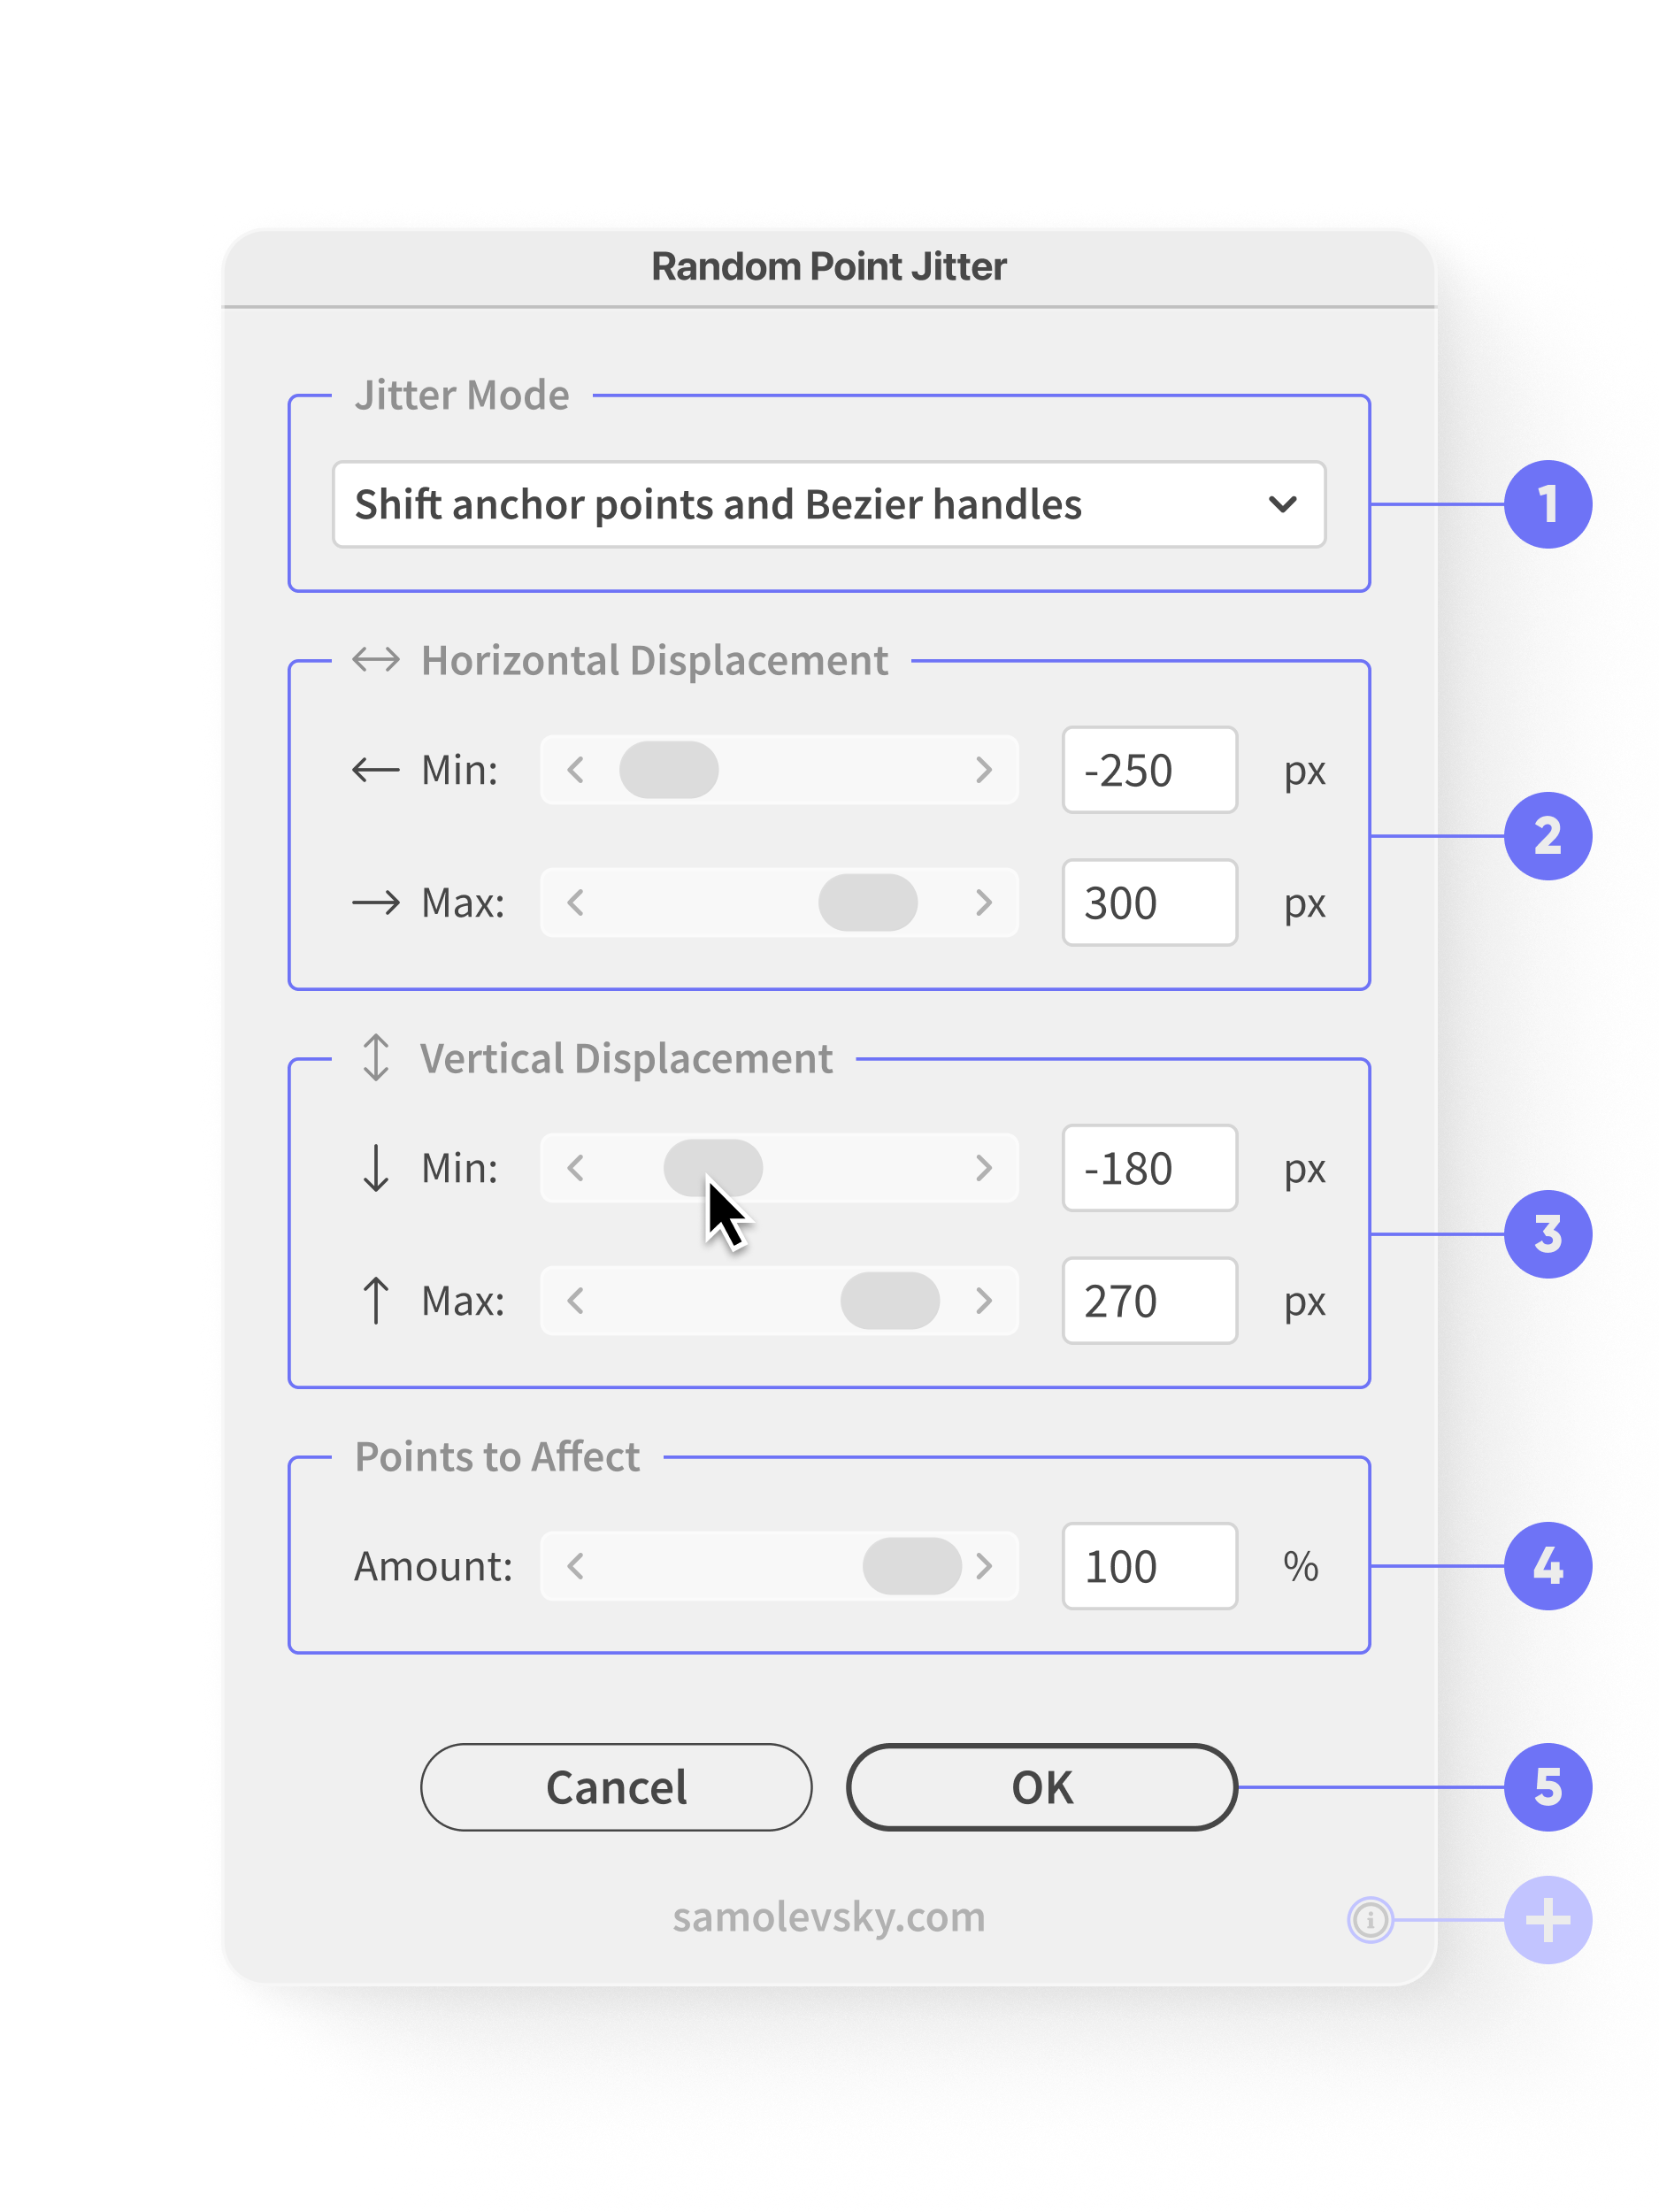
    Upon running, a dialog window will appear with the following components:


➊ Select a Jitter Mode

The 'Jitter Mode' dropdown menu in the script allows users to select how the jitter effect is applied to the path points. It provides three modes of operation:


1.1 Shift anchor points and Bezier handles

  • Moves both the anchor points (the main points defining the path) and their Bezier handles (which control curve direction and smoothness).
  • This mode provides the most drastic change, as both the shape and curvature of the path will be affected.

1.2 Shift only anchor points (Default option)

  • Moves only the anchor points while keeping the Bezier handles unchanged.
  • This alters the overall shape of the path but maintains the existing curve directions.
  • Useful for introducing randomness while keeping the sharp corners or smoothness of curves intact.

1.3 Shift only Bezier handles

  • Moves only the Bezier handles, keeping the anchor points in their original positions.
  • This changes the curvature of the path without modifying its structure.
  • Ideal for subtly altering the flow of curved paths without distorting their general shape.

Each selection immediately updates the jitter effect, allowing users to preview how the path is affected in real time.


➋ Adjust Horizontal Displacement Range

The ↔︎ Horizontal Displacement section controls how much the selected points (anchor points and/or Bezier handles) move left or right when applying the jitter effect. This section consists of two adjustable settings:


2.1 Minimum Horizontal Displacement (← Min)

  • Defines the smallest possible leftward movement of points.
  • Negative values move points to the left.
  • Positive values reduce the leftward movement limit.

Example: Setting Min to -250 px means points can move left by up to 250 pixels.

2.2 Maximum Horizontal Displacement (→ Max)

  • Defines the largest possible rightward movement of points.
  • Positive values move points to the right.
  • Negative values reduce the rightward movement limit.

Example: Setting Max to 300 px means points can move right by up to 300 pixels.

How it Works

  • The script randomly assigns each affected point a movement value between the Min and Max range.
  • Example: If Min = -250 px and Max = 300 px, each point will shift horizontally somewhere between 250 pixels left and 300 pixels right.
  • If both Min and Max are set to 0, no horizontal movement occurs.

Adjustments

  • Sliders provide an easy way to set values within -1000px to 1000px.
  • Input fields allow precise value entry for fine-tuned control.

The Horizontal Displacement section gives users control over randomized left-right shifting, allowing for both subtle and extreme effects. 


➌ Adjust Vertical Displacement Range

The ↕︎ Vertical Displacement section controls how much the selected points (anchor points and/or Bezier handles) move up or down when applying the jitter effect. This section includes two adjustable settings:


3.1. Minimum Vertical Displacement (↓ Min)

  • Defines the smallest possible downward movement of points.
  • Negative values move points downward.
  • Positive values reduce the downward movement limit.

Example: Setting Min to -180 px means points can move down by up to 180 pixels.

3.2 Maximum Vertical Displacement (↑ Max)

  • Defines the largest possible upward movement of points.
  • Positive values move points upward.
  • Negative values reduce the upward movement limit.

Example: Setting Max to 270 px means points can move up by up to 270 pixels.

How it Works

  • The script randomly assigns each affected point a movement value between the Min and Max range.
  • Example: If Min = -180 px and Max = 270 px, each point will shift vertically somewhere between 180 pixels down and 270 pixels up.
  • If both Min and Max are set to 0, no vertical movement occurs.

Adjustments

  • Sliders provide an easy way to set values within -1000px to 1000px.
  • Input fields allow precise value entry for fine-tuned control.

This section provides control over randomized up-down shifting, useful for adding organic movement and natural variations to vector paths.


➍ Set Percentage of Affected Points

The 'Points to Affect' section controls how many points in the selected paths will be affected by the jitter effect. Instead of applying the jitter to all points, this setting allows for partial randomization, creating a more organic look.


Functionality

  • The percentage value determines the proportion of anchor points and/or Bezier handles that will move.
  • A higher percentage results in more points being affected, while a lower percentage limits the effect to a smaller subset.

How it Works

  • The script randomly selects a number of points based on the chosen percentage.
  • This section is useful for adding controlled randomness, ensuring that only a selected portion of points is affected rather than all at once.

Example: If a path has 100 points and the percentage is set to 50%, only 50 points will be moved randomly. If the percentage is set to 100%, all points will be shifted.


➎ Finalizing Changes

ㅤ 

OK Button – Applies the jitter effect and closes the window.

Cancel Button – Restores the original points and closes the window.

ㅤ 


➏ Additional Notes

ㅤ 

Keyboard Shortcuts:

  • Up/Down Arrow keys increases/decreases input values in 1 px.
  • Shift + Up/Down Arrow keys increases/decreases values in larger steps (10px).
  • Ctrl (Command) + Up/Down Arrow keys makes finer adjustments (0.1px).

ㅤ 

Open User Guide

  • Clicking ⏼ icon in the bottom right corner of the panel opens the user guide in a web browser.
  • This provides additional instructions and details on how to use the script.

Overall, the Random Point Jitter script provides a powerful yet intuitive way to introduce controlled randomness to vector paths in Adobe Illustrator. By adjusting jitter settings for anchor points and Bezier handles, users can create natural-looking variations in their artwork.

Leave a comment

Random Point Jitter

Version: 1.0.0

Updated:

    • 1.0.0 – Initial release.

    Tested on MacOS:

    • Adobe Illustrator 2023 (27.0)
    • Adobe Illustrator 2024 (28.1)
    • Adobe Illustrator 2025 (29.0.1)
  • Supported Versions:

    • Compatible with Adobe Illustrator CS6 and later, including Adobe Illustrator CC versions.

    Operating Systems:

    • Works on both macOS and Windows platforms.
  • End User License Agreement (EULA)

    Last Updated: 21.12.2024

    This End User License Agreement (“Agreement”) is a legal agreement between you (“User” or “Licensee”) and Samolevsky.com (“Licensor”) regarding the use of the Adobe Illustrator scripts (“Software”). By downloading, installing, or using the Software, you agree to be bound by the terms of this Agreement.

    1. Grant of License

    Licensor grants the User a non-exclusive, non-transferable, and revocable license to use the Software in accordance with this Agreement.

    • Free Software: If the Software is provided for free, you may use it for personal or commercial purposes without payment, subject to the restrictions outlined in this Agreement.
    • Paid Software: If the Software is provided for a fee, you may use it only after payment has been made in full.

    2. Usage Rights

    You are permitted to:

    • Install and use the Software on devices you own or control.
    • Use the Software in your personal or commercial projects, subject to compliance with this Agreement.

    3. Restrictions

    You may NOT:

    • Reverse engineer, decompile, or otherwise attempt to discover the source code, underlying ideas, or algorithms of the Software.
    • Reuse, incorporate, or integrate any portion of the Software into any other software, product, or project, except as expressly permitted by the Licensor in writing.
    • Resell, redistribute, or share the Software, whether in its original or modified form, without prior written consent from the Licensor.
    • Claim ownership of the Software or its underlying code.
    • Use the Software in any way that violates applicable laws or regulations.

    4. Ownership

    The Software and all intellectual property rights therein remain the exclusive property of the Licensor. This Agreement does not transfer ownership of the Software or any intellectual property rights to the User.

    5. Disclaimer of Warranties

    THE SOFTWARE IS PROVIDED “AS IS”, WITHOUT WARRANTY OF ANY KIND, EXPRESS OR IMPLIED, INCLUDING BUT NOT LIMITED TO THE WARRANTIES OF MERCHANTABILITY, FITNESS FOR A PARTICULAR PURPOSE, AND NONINFRINGEMENT. IN NO EVENT SHALL THE LICENSOR BE LIABLE FOR ANY CLAIM, DAMAGES, OR OTHER LIABILITY, WHETHER IN AN ACTION OF CONTRACT, TORT, OR OTHERWISE, ARISING FROM, OUT OF OR IN CONNECTION WITH THE SOFTWARE OR THE USE OR OTHER DEALINGS IN THE SOFTWARE.

    6. Limitation of Liability

    To the maximum extent permitted by law, Licensor shall not be liable for any damages, including but not limited to direct, indirect, incidental, special, or consequential damages, arising out of or related to the use or inability to use the Software.

    7. Termination

    This Agreement is effective until terminated. Licensor may terminate this Agreement immediately if you breach any term of this Agreement. Upon termination, you must cease all use of the Software and destroy any copies in your possession.

    8. Updates and Support

    Licensor is not obligated to provide updates, support, or maintenance for the Software. However, updates may be provided at the sole discretion of the Licensor.

    9. Governing Law

    This Agreement shall be governed by and construed in accordance with the laws of the State of New York, without regard to its conflict of law principles.

    10. Entire Agreement

    This Agreement constitutes the entire agreement between you and the Licensor concerning the Software and supersedes all prior or contemporaneous understandings regarding such subject matter.

    By using the Software, you acknowledge that you have read this Agreement, understand it, and agree to be bound by its terms.

    For any questions or concerns regarding this Agreement, please contact us at hello@samolevsky.com

Required Software

Adobe Illustrator

Adobe Illustrator is a professional vector graphics software developed by Adobe Inc. It is widely used by designers, illustrators, and artists for creating a variety of digital artwork, including logos, icons, illustrations, typography, and complex design layouts. Illustrator is known for its precision and scalability, allowing users to create high-quality graphics that can be resized without losing clarity. Its features include powerful drawing tools, customizable brushes, advanced typography options, and seamless integration with other Adobe Creative Cloud applications. Illustrator is a go-to tool for creative professionals working on projects for print, web, and multimedia platforms.

  • 🅰 Locating the Scripts Folder

    To install a Random Point Jitter.jsx script in Adobe Illustrator, you need to place it in the correct directory where Illustrator
can recognize it. Follow these steps to locate the Scripts folder:

    1. MacOS:
      Open Finder and navigate to:
      Applications/Adobe Illustrator <Version>/Presets/<Language>/Scripts.
    2. Windows:
      Open File Explorer and navigate to:
      C:\Program Files\Adobe\Adobe Illustrator <Version>\Presets\<Language>\Scripts
    3. Replace <Version> with your Adobe Illustrator version (e.g., 2025).
    4. Replace <Language> with your language folder (e.g., "de_DE" for German, "en_US" for English).

    🅱 Installing the Script

    1. Copy the Script File: Copy the Random Point Jitter.jsx file to the Scripts folder located in the path above.
    2. On some systems, you may need administrator permissions to modify the Scripts folder.
    3. Restart Adobe IllustratorTo refresh the scripts menu, close and reopen Adobe Illustrator.

    Explore our complete guide to mastering Adobe Illustrator scripts.

    1. Open Adobe Illustrator and ensure a document is active.
    2. Go to the top menu bar and select File > Scripts.
    3. If the script is installed in the Scripts folder, it will appear in the dropdown list.
    4. Click the Random Point Jitter script to run it.
    5. The Random Point Jitter script will execute, and any dialog boxes or results will appear based on the script’s functionality.

    ☻ Before running any scripts, it’s strongly advised to save your work — especially when working with complex or large documents.

Got questions?

Need help or have an idea to share? We’d love to hear from you! Whether you have questions, found a bug, have a feature request, or just want to share your feedback, reach out to us—we’re here for you! 

Browse More Scripts

  1. Read more: Select Off-Artboard Objects
    Select Off-Artboard Objects

    Select Off-Artboard Objects

    This script for Adobe Illustrator helps you easily select objects that are either inside or outside the boundaries of your artboards. It's particularly useful for cleaning up designs by finding and managing stray objects outside your active work area.

    Read more
  2. Read more: Create Artboards from Selection
    Create Artboards from Selection

    Create Artboards from Selection

    This advanced Adobe Illustrator script automates the creation of artboards from selected objects. It's designed to streamline your workflow when you need to create multiple artboards based on existing design elements.

    Read more
  3. Read more: Paste to Replace
    Paste to Replace

    Paste to Replace

    The Paste to Replace script for Adobe Illustrator enables users to replace selected objects with clipboard content efficiently. It provides a user-friendly interface with options to maintain the original size, fit proportionally, or stretch to fit.

    Read more